


新闻中心 
毕业季--DIY毕业照
 2025-07-29
 浏览次数:次
 返回列表
返回列表本项目针对疫情期间毕业生无法拍摄毕业照的遗憾,提供DIY毕业照解决方案。通过AI换lian将个人人脸合成到样本图,再经毕业服装抠图与合成、人体抠图与学校背景合成,完成毕业照制作。使用paddlehub等工具实现,但存在服装学科颜色、帽子垂穗处理等需完善的瑕疵,最终祝福毕业生前程似锦。
☞☞☞AI 智能聊天, 问答助手, AI 智能搜索, 免费无限量使用 DeepSeek R1 模型☜☜☜

项目简介
由于疫情的影响,许多毕业生他们可能都没办法拥有一张属于自己的毕业照,这将成为许多人说遗憾。于是便做了这样一个DIY毕业照的项目,最后祝福各位毕业生前程似锦,万事如意。
效果展示
人脸照片:
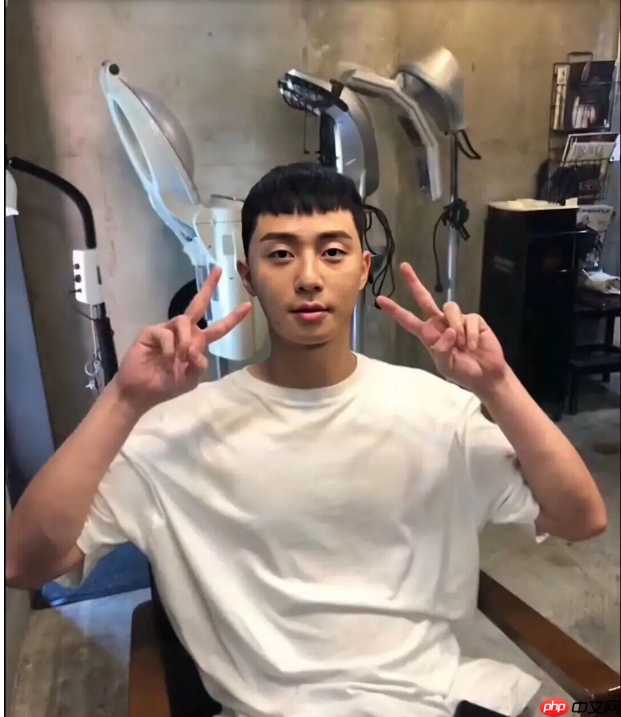
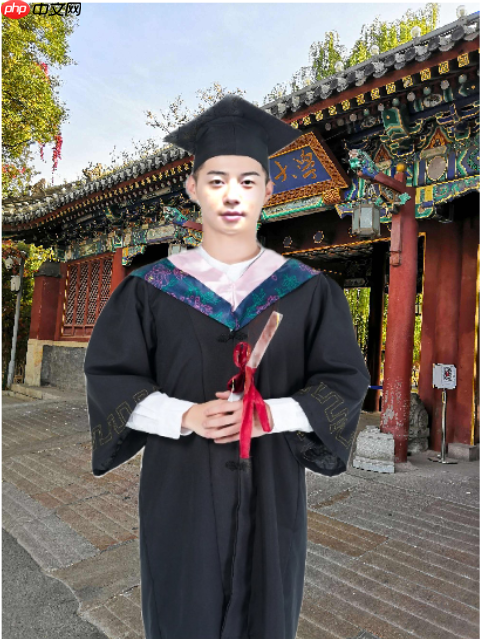
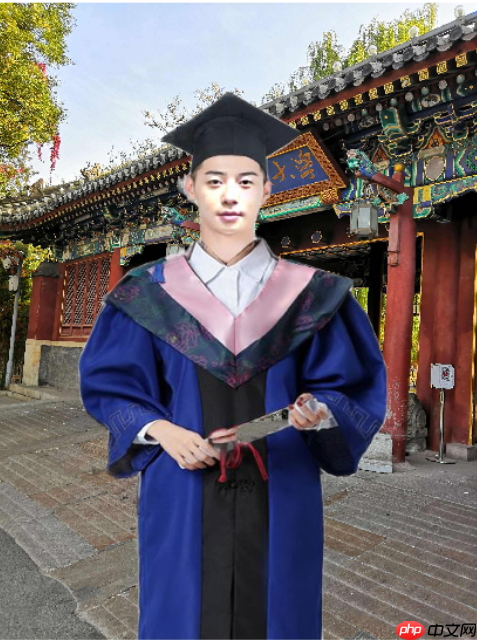
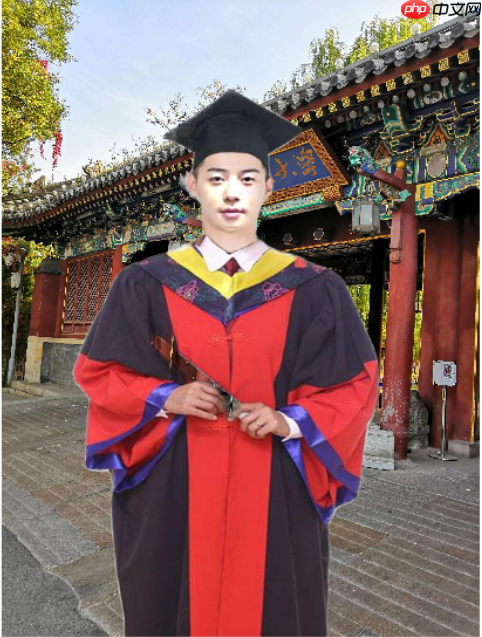
合成毕业照:
学士服:
硕士服:
博士服:
(PS:示例图片均来源于互联网,如有侵权,请联系删除)
 笔灵AI论文写作
免费生成毕业论文、课题论文、千字大纲,几万字专业初稿!
 74
查看详情
74
查看详情

一、安装必要的包
In [1]!pip install --upgrade paddlehub -i https://mirror.baidu.com/pypi/simple !hub install deeplabv3p_xception65_humanseg==1.1.2
二、AI换lian
把自己的脸合成到样本图上
只需修改im1,im2
im1:自己脸的图片
im2:样本图
In [ ]import cv2import numpy as npimport paddlehub as hubIn [ ]
def get_image_size(image):
    """
    获取图片大小(高度,宽度)
    :param image: image
    :return: (高度,宽度)
    """
    image_size = (image.shape[0], image.shape[1])    return image_sizedef get_face_landmarks(image):
    """
    获取人脸标志,68个特征点
    :param image: image
    :param face_detector: dlib.get_frontal_face_detector
    :param shape_predictor: dlib.shape_predictor
    :return: np.array([[],[]]), 68个特征点
    """
    dets = face_landmark.keypoint_detection([image])
    num_faces = len(dets[0]['data'][0])    if num_faces == 0:        print("Sorry, there were no faces found.")        return None
    # shape = shape_predictor(image, dets[0])
    face_landmarks = np.array([[p[0], p[1]] for p in dets[0]['data'][0]])    return face_landmarksdef get_face_mask(image_size, face_landmarks):
    """
    获取人脸掩模
    :param image_size: 图片大小
    :param face_landmarks: 68个特征点
    :return: image_mask, 掩模图片
    """
    mask = np.zeros(image_size, dtype=np.int32)
    points = np.concatenate([face_landmarks[0:16], face_landmarks[26:17:-1]])
    points = np.array(points, dtype=np.int32)

    cv2.fillPoly(img=mask, pts=[points], color=255)    # mask = np.zeros(image_size, dtype=np.uint8)
    # points = cv2.convexHull(face_landmarks)  # 凸包
    # cv2.fillConvexPoly(mask, points, color=255)
    return mask.astype(np.uint8)def get_affine_image(image1, image2, face_landmarks1, face_landmarks2):
    """
    获取图片1仿射变换后的图片
    :param image1: 图片1, 要进行仿射变换的图片
    :param image2: 图片2, 只要用来获取图片大小,生成与之大小相同的仿射变换图片
    :param face_landmarks1: 图片1的人脸特征点
    :param face_landmarks2: 图片2的人脸特征点
    :return: 仿射变换后的图片
    """
    three_points_index = [18, 8, 25]
    M = cv2.getAffineTransform(face_landmarks1[three_points_index].astype(np.float32),
                               face_landmarks2[three_points_index].astype(np.float32))
    dsize = (image2.shape[1], image2.shape[0])
    affine_image = cv2.warpAffine(image1, M, dsize)    return affine_image.astype(np.uint8)def get_mask_center_point(image_mask):
    """
    获取掩模的中心点坐标
    :param image_mask: 掩模图片
    :return: 掩模中心
    """
    image_mask_index = np.argwhere(image_mask > 0)
    miny, minx = np.min(image_mask_index, axis=0)
    maxy, maxx = np.max(image_mask_index, axis=0)
    center_point = ((maxx + minx) // 2, (maxy + miny) // 2)    return center_pointdef get_mask_union(mask1, mask2):
    """
    获取两个掩模掩盖部分的并集
    :param mask1: mask_image, 掩模1
    :param mask2: mask_image, 掩模2
    :return: 两个掩模掩盖部分的并集
    """
    mask = np.min([mask1, mask2], axis=0)  # 掩盖部分并集
    mask = ((cv2.blur(mask, (5, 5)) == 255) * 255).astype(np.uint8)  # 缩小掩模大小
    mask = cv2.blur(mask, (3, 3)).astype(np.uint8)  # 模糊掩模
    return maskdef skin_color_adjustment(im1, im2, mask=None):
    """
    肤色调整
    :param im1: 图片1
    :param im2: 图片2
    :param mask: 人脸 mask. 如果存在,使用人脸部分均值来求肤色变换系数;否则,使用高斯模糊来求肤色变换系数
    :return: 根据图片2的颜色调整的图片1
    """
    if mask is None:
        im1_ksize = 55
        im2_ksize = 55
        im1_factor = cv2.GaussianBlur(im1, (im1_ksize, im1_ksize), 0).astype(np.float)
        im2_factor = cv2.GaussianBlur(im2, (im2_ksize, im2_ksize), 0).astype(np.float)    else:
        im1_face_image = cv2.bitwise_and(im1, im1, mask=mask)
        im2_face_image = cv2.bitwise_and(im2, im2, mask=mask)
        im1_factor = np.mean(im1_face_image, axis=(0, 1))
        im2_factor = np.mean(im2_face_image, axis=(0, 1))

    im1 = np.clip((im1.astype(np.float) * im2_factor / np.clip(im1_factor, 1e-6, None)), 0, 255).astype(np.uint8)    return im1def main():
    im1 = cv2.imread("face.png")  # face_image
    im1 = cv2.resize(im1, (600, im1.shape[0] * 600 // im1.shape[1]))
    landmarks1 = get_face_landmarks(im1)  # 68_face_landmarks
    if landmarks1 is None:        print('{}:检测不到人脸'.format(image_face_path))
        exit(1)
    im1_size = get_image_size(im1)  # 脸图大小
    im1_mask = get_face_mask(im1_size, landmarks1)  # 脸图人脸掩模


    # ret_val, im2 = cam.read()  # camera_image
    im2 = cv2.imread("di_zhao.png")
    landmarks2 = get_face_landmarks(im2)  # 68_face_landmarks
    if landmarks2 is not None:
        im2_size = get_image_size(im2)  # 摄像头图片大小
        im2_mask = get_face_mask(im2_size, landmarks2)  # 摄像头图片人脸掩模

        affine_im1 = get_affine_image(im1, im2, landmarks1, landmarks2)  # im1(脸图)仿射变换后的图片
        affine_im1_mask = get_affine_image(im1_mask, im2, landmarks1, landmarks2)  # im1(脸图)仿射变换后的图片的人脸掩模

        union_mask = get_mask_union(im2_mask, affine_im1_mask)  # 掩模合并

        # affine_im1_face_image = cv2.bitwise_and(affine_im1, affine_im1, mask=union_mask)  # im1(脸图)的脸
        # im2_face_image = cv2.bitwise_and(im2, im2, mask=union_mask)  # im2(摄像头图片)的脸
        # cv2.imshow('affine_im1_face_image', affine_im1_face_image)
        # cv2.imshow('im2_face_image', im2_face_image)

        affine_im1 = skin_color_adjustment(affine_im1, im2, mask=union_mask)  # 肤色调整
        point = get_mask_center_point(affine_im1_mask)  # im1(脸图)仿射变换后的图片的人脸掩模的中心点
        seamless_im = cv2.seamlessClone(affine_im1, im2, mask=union_mask, p=point, flags=cv2.NORMAL_CLONE)  # 进行泊松融合

        # cv2.imshow('affine_im1', affine_im1)
        # cv2.imshow('im2', im2)
        # cv2.imshow('seamless_im', seamless_im)
        cv2.imwrite('hecheng.jpg', seamless_im)        # plt.imshow(seamless_im)
        # plt.show()

    else:
        cv2.imshow('seamless_im', im2)        # plt.imshow(im2)
        # plt.show()if __name__ == '__main__':
    face_landmark = hub.Module(name="face_landmark_localization")
    main()
[2025-06-07 11:22:24,086] [ WARNING] - The _initialize method in HubModule will soon be deprecated, you can use the __init__() to handle the initialization of the object
[2025-06-07 11:22:24,177] [ WARNING] - The _initialize method in HubModule will soon be deprecated, you can use the __init__() to handle the initialization of the object
三、毕业服装抠图与合成
In [ ]#调用一些相关的包import matplotlibimport matplotlib.pyplot as plt import matplotlib.image as mpimg import cv2from PIL import Imageimport numpy as npimport paddlehub as hubIn [ ]
# S1  衣服图片抠图 ---------------------------------------------------------------------module = hub.Module(name="deeplabv3p_xception65_humanseg")
res = module.segmentation(paths = ["bo.png"], visualization=True, output_dir='pic_output')


res_img_path = './pic_output/bo.png'img = mpimg.imread(res_img_path)
plt.figure(figsize=(10, 10))
plt.imshow(img)
plt.axis('off')
plt.show()
[2025-06-07 16:11:24,181] [ WARNING] - The _initialize method in HubModule will soon be deprecated, you can use the __init__() to handle the initialization of the object
<Figure size 720x720 with 1 Axes>In [ ]
# S2  显示原始图片 ---------------------------------------------------------------------# 原始图片test_img_path = ["hecheng.jpg"]#import numpy as np #wpb addimg = mpimg.imread(test_img_path[0])

# 展示 原始图片plt.figure(figsize=(10,10))
plt.imshow(img) #wpb comment#plt.imshow(img.astype(np.uint8))#wpb addplt.axis('off')
plt.show()
<Figure size 720x720 with 1 Axes>In [ ]
# S3  获取关键点图像 ---------------------------------------------------------------------module = hub.Module(name="human_pose_estimation_resnet50_mpii")
res = module.keypoint_detection(paths = ["hecheng.jpg"], visualization=True, output_dir='pic_output')

res_img_path = './pic_output/hecheng.jpg'img = mpimg.imread(res_img_path)
plt.figure(figsize=(10, 10))
plt.imshow(img)
plt.axis('off')
plt.show()print(res)
[2025-06-07 16:12:03,050] [ WARNING] - The _initialize method in HubModule will soon be deprecated, you can use the __init__() to handle the initialization of the object
image s*ed in pic_output/hechengtime=1654589524.jpg
<Figure size 720x720 with 1 Axes>
[{'path': 'hecheng.jpg', 'data': OrderedDict([('left_ankle', [205, 698]), ('left_knee', [200, 698]), ('left_hip', [211, 490]), ('right_hip', [269, 482]), ('right_knee', [274, 705]), ('right_ankle', [264, 297]), ('pelvis', [227, 490]), ('thorax', [242, 319]), ('upper_neck', [242, 267]), ('head_top', [242, 133]), ('right_wrist', [190, 467]), ('right_elbow', [110, 423]), ('right_shoulder', [153, 319]), ('left_shoulder', [332, 319]), ('left_elbow', [369, 430]), ('left_wrist', [279, 467])])}]
<br/>In [ ]
# S4 换衣服 ---------------------------------------------------------------------#获取衣服位置left_posx=res[0]["data"]["right_shoulder"][0]
left_posy=res[0]["data"]["right_shoulder"][1]
right_posx=res[0]["data"]["left_ankle"][0]
right_posy=res[0]["data"]["left_ankle"][1]print(left_posx, left_posy)print(right_posx, right_posy)#读取图片Image1 = Image.open('hecheng.jpg')
Image1copy = Image1.copy()
Image2 = Image.open('pic_output/bo.png')
Image2copy = Image2.copy()
#resize clothes 可以对抠出的服装图片进行放大缩小width,height=Image1copy.size
newsize=(int(width*1.0),int(height*0.9))
Im age2copy = Image2.resize(newsize)#制定要粘贴左上角坐标 可以抠出的服装图片进行移动position=(int(left_posx*-0.07),int(left_posy*0.55) ) # ,right_posx, right_posyprint(position)# 换衣服 , 应该还有更好的方法进行照片合成Image1copy.paste(Image2copy,position,Image2copy) # 将翻转后图像region 粘贴到 原图im 中的 box位置
# 存为新文件 #Image1copy.s*e('./pic_output/newclothes.png') Image1copy.s*e('./pic_output/newclothes_bo.jpg')
# 显示穿着新衣的照片img = mpimg.imread('./pic_output/newclothes_bo.jpg')
plt.figure(figsize=(10,10))
plt.imshow(img)
plt.axis('off')
plt.show()
age2copy = Image2.resize(newsize)#制定要粘贴左上角坐标 可以抠出的服装图片进行移动position=(int(left_posx*-0.07),int(left_posy*0.55) ) # ,right_posx, right_posyprint(position)# 换衣服 , 应该还有更好的方法进行照片合成Image1copy.paste(Image2copy,position,Image2copy) # 将翻转后图像region 粘贴到 原图im 中的 box位置
# 存为新文件 #Image1copy.s*e('./pic_output/newclothes.png') Image1copy.s*e('./pic_output/newclothes_bo.jpg')
# 显示穿着新衣的照片img = mpimg.imread('./pic_output/newclothes_bo.jpg')
plt.figure(figsize=(10,10))
plt.imshow(img)
plt.axis('off')
plt.show()
 age2copy = Image2.resize(newsize)#制定要粘贴左上角坐标 可以抠出的服装图片进行移动position=(int(left_posx*-0.07),int(left_posy*0.55) ) # ,right_posx, right_posyprint(position)# 换衣服 , 应该还有更好的方法进行照片合成Image1copy.paste(Image2copy,position,Image2copy) # 将翻转后图像region 粘贴到 原图im 中的 box位置
# 存为新文件 #Image1copy.s*e('./pic_output/newclothes.png') Image1copy.s*e('./pic_output/newclothes_bo.jpg')
# 显示穿着新衣的照片img = mpimg.imread('./pic_output/newclothes_bo.jpg')
plt.figure(figsize=(10,10))
plt.imshow(img)
plt.axis('off')
plt.show()
age2copy = Image2.resize(newsize)#制定要粘贴左上角坐标 可以抠出的服装图片进行移动position=(int(left_posx*-0.07),int(left_posy*0.55) ) # ,right_posx, right_posyprint(position)# 换衣服 , 应该还有更好的方法进行照片合成Image1copy.paste(Image2copy,position,Image2copy) # 将翻转后图像region 粘贴到 原图im 中的 box位置
# 存为新文件 #Image1copy.s*e('./pic_output/newclothes.png') Image1copy.s*e('./pic_output/newclothes_bo.jpg')
# 显示穿着新衣的照片img = mpimg.imread('./pic_output/newclothes_bo.jpg')
plt.figure(figsize=(10,10))
plt.imshow(img)
plt.axis('off')
plt.show()153 319 205 698 (-10, 175)
<Figure size 720x720 with 1 Axes>
四、合成学校背景图片
In [2]import paddlehub as hubimport matplotlib.pyplot as plt import matplotlib.image as mpimg import cv2from PIL import Imageimport numpy as npimport mathIn [7]
import paddlehub as hubimport numpy as npimport matplotlib.pyplot as plt
import matplotlib.image as mpimg
#加载预训练模型"deeplabv3p_xception65_humanseghumanseg = hub.Module(name="deeplabv3p_xception65_humanseg")#可以添加多张图片img_path = ["hecheng.jpg"]

results = humanseg.segmentation(data={"image":img_path},visualization=True, output_dir='humanseg_output')#遍历图片抠图结果for i in range(len(img_path)):    #呈现原图
    img1 = mpimg.imread(img_path[i])
    plt.figure(figsize=(10,10))
    plt.imshow(img1)
    plt.axis('off')
    plt.show()
    result=results[i]    print(result)    #打印 抠图结果的数字列表
    # print(result["data"].shape)
    #以图形方式呈现结果
    prediction = result["data"]
    plt.imshow(prediction)
    plt.show()    #运用线性代数实现:使用抠图数据剪切原图
    newimg = np.zeros(img1.shape)
    newimg[:,:,0] = img1[:,:,0] * (prediction>0)
    newimg[:,:,1] = img1[:,:,1] * (prediction>0)
    newimg[:,:,2] = img1[:,:,2] * (prediction>0)
    newimg = newimg.astype(np.uint8)

    # 抠图结果展示
    plt.figure(figsize=(10,10))
    plt.imshow(newimg)
    plt.axis('off')
    plt.show()
[2025-06-07 16:48:59,533] [ WARNING] - The _initialize method in HubModule will soon be deprecated, you can use the __init__() to handle the initialization of the object
<Figure size 720x720 with 1 Axes>
{'s*e_path': 'humanseg_output/hecheng.png', 'data': array([[0., 0., 0., ..., 0., 0., 0.],
       [0., 0., 0., ..., 0., 0., 0.],
       [0., 0., 0., ..., 0., 0., 0.],
       ...,
       [0., 0., 0., ..., 0., 0., 0.],
       [0., 0., 0., ..., 0., 0., 0.],
       [0., 0., 0., ..., 0., 0., 0.]], dtype=float32)}
<br/>
<Figure size 432x288 with 1 Axes>
<Figure size 720x720 with 1 Axes>In [8]
base_image = Image.open(f'xuexiao.jpeg').convert('RGB')
fore_image = Image.open(f'humanseg_output/hecheng.png').resize(base_image.size)# 图片加权合成scope_map = np.array(fore_image)[:,:,-1] / 255scope_map = scope_map[:,:,np.newaxis]
scope_map = np.repeat(scope_map, repeats=3, axis=2)
res_image = np.multiply(scope_map, np.array(fore_image)[:,:,:3]) + np.multiply((1-scope_map), np.array(base_image))#保存图片res_image = Image.fromarray(np.uint8(res_image))
res_image.s*e(f"humanseg_output/hecheng_xue.jpg")print('照片合成完毕')
plt.figure(figsize=(10,10))
plt.imshow(res_image)
plt.axis('off')
plt.show()
照片合成完毕
<Figure size 720x720 with 1 Axes>
总结
本次项目主要使用了脸部抠图+合成、衣服抠图+合成、人体抠图+背景合成,这三大块的功能来完成。但是仍然存在瑕疵。例如服装上学科代表的颜色和帽子垂穗颜色不能更换、以及最后合成后的帽子垂穗会消失,这都是后面需要完善的地方。
以上就是毕业季--DIY毕业照的详细内容,更多请关注其它相关文章!
# ai
# 工具
# 论文写作
# 自己的
# 的人
# 中文网
# 抠图
# type
# warp
# fig
# deepl
# igs
# red
# 福建论坛营销推广渠道
# 上饶网络营销推广的方法
# 鹿泉做网站建设
# seo收费系统
# 铜川企业网站优化方法
# 上海金山seo优化排名
# seo石家庄工作群
# 竞价排名的关键词价格
# 台州网站优化怎么做
# 里水营销网站建设
# 脸部
# 首款
# 工作流
# 中心点
# 前程似锦
相关栏目:
【
行业资讯67740 】
【
技术百科0 】
【
网络运营39195 】
相关推荐:
双十一哪一天买比较便宜?
juice是什么意思
哪些库是typescript
ftp$如何执行宏命令
使用typescript对团队有什么要求
win10如何开启命令行
市盈率负值是什么意思
j*a中如何创建列表数组
solidworks打开igs文件看不见要怎么办解决方法
春运辅助抢票怎么抢
单片机引脚怎么改成上拉
单片机是怎么复位的
为什么都用typescript
树莓派命令行如何新建文件
红米手机怎么设置变成5G手机
市盈率为负数是什么意思
typescript怎么使用vue
企业征信不好如何恢复 企业征信不好怎么恢复步骤
苹果16要升级哪些功能
dos命令 如何将变量 作为路径的一部分
市盈率是什么意思高好还是低好
如何提高固态硬盘性能
喇叭上POWER4欧是什么意思
燃气热水器上的power是什么意思
play的三人称单数和过去式
征信不好如何快速恢复 征信不好快速恢复的方法
小屏折叠屏手机有哪些
新网站如何填写域名解析
为什么ai老是说链接面板中缺少某些文件
平仓是什么意思?
虚拟机如何用命令清除垃圾
typescript怎么写react
j*a怎么存放数组中
typescript能干什么
如何知道固态硬盘
vi命令如何使用方法
如何在固态硬盘上安装win7系统
笔记本如何使用固态硬盘
typescript如何做项目
苹果16更新了哪些功能
为什么要用typescript6
干股是什么意思
今天是农历多少号
统计学中power值是什么意思
如何判断固态硬盘端口
8英寸等于多少厘米
5g手机4g卡怎么没有网络
j*a怎么读取char数组
typescript解决了什么
万能表上的power是什么意思
